How to copy a MySQL database from one Windows server to another

Long story short, I recently had a client who has a Apache-PHP-MySQL site running off of a Windows server, and while DBA stuff usually isn’t in my wheelhouse, I nonetheless ended up having to figure out a way to transfer a MySQL database from the current server to another Windows machine. I… didn’t have a good time.

Eventually, though, I scrapped together a (no doubt incredibly backwards and inefficient) solution of sorts from the following resources:

So for the edification of the public — as well as myself in case I ever have the misfortune of having to do this again at some point — here’s the process that wound up working for me. Please note that these instructions assume that (a) you have remote access to both machines, (b) you have the root password for both MySQL installs, and (c) the MySQL folder is not on either machine’s system path (as one or both of these was a production server and I didn’t want to risk messing with the settings.)

So here’s how to copy a MySQL database from Server 1 to Server 2:

1. Open up a Command Prompt on Server 1.

2. Navigate to the MySQL bin folder. In other words, cd C:\{{whatever the path is}}\MySQL\bin.

3. Run the following command: mysqldump {{dbname}} --user=root --password={{password}} -r C:\{{whatever path}}\dump.sql. Add in the --verbose flag if you want to make sure it’s working.

And no, before you ask, you can’t just do .\mysqldump {{dbname}} > dump.sql from within PowerShell. Turns out that PowerShell mucks with the file encoding when using the > operator. So don’t be like me and waste a half-hour or so on that.

4. Copy dump.sql (or whatever you called the file) from Server 1 to Server 2. Put it somewhere low in the file hierarchy so it’s easy to get to.

5. Open up a Command Prompt on Server 2.

6. Navigate to the MySQL bin folder. Once again, cd C:\{{whatever the path on Server 2 is}}\MySQL\bin.

7. Enter the mysql shell via the following command: mysql --user=root --password={{password}}.

8. Run these SQL commands in order:

CREATE DATABASE {{dbname}};
USE {{dbname}};
source C:\{{path to file}}\dump.sql;

Is there an easier way of doing all of this? No doubt. But this way seems to have worked. And at two or three in the morning, that in itself is worth its weight in gold.

Knockout Extension: Hidden Binding

Just realized I can’t even find the basic hidden binding anywhere online (except in CoffeeScript, for some reason.) For eff’s sake, guys.

Direct link to gist

(And yes, I could quite easily remove the jQuery dependency, were I not lazy. But since pretty much everything I’ve been working on for at least a year has involved Bootstrap in some form, well…)

Knockout Extension: Bootstrap Form Group State

Have been meaning to clean something like this up and share it for a while. There seems to be a lack of Knockout.js extensions online these days. The curse of a stable codebase that’s no longer the latest/greatest thing, I guess. Anyway, since it feels like I must’ve rewritten this same code half-a-dozen times now, I thought I might as well throw this up online — for my own reference, if nothing else.

Direct link to gist

Postmortem: grawlix v1.0.6

Profanity is an odd beast. Practically everyone knows it when they see it; but the more you try to break down exactly makes certain words obscene and others not, the harder it becomes to explain. As fast as language evolves and changes, there’s only one thing you can be certain of: somewhere, there’s always someone working hard on new ways to offend other people.

About a month or so ago, I found myself in need of a Node.js profanity filter. Searching the NPM registry came up with a number of possible solutions, but none of them seemed to quite match what I was looking for. I wanted something that wouldn’t replace words blindly, preferably by using tuned regular expressions to try and avoid censoring relatively innocent communication (a scenario that people refer to as the Scunthorpe problem.) I mean, that’s pretty basic stuff, right? Tons of people have probably written code to do exactly that over the years. Someone must’ve gotten around to sharing their solution at some point.

Or so one would think. Instead, nearly everything I found seemed to involve brute-force approaches, usually by matching directly against an immense list of possible obscenities (possibly for reasons of optimization? I know that attacks against badly-written regexs can be a possible security issue…). The problem with that strategy is that people (or at least 4channers) are constantly generating new ways to spell or signal obscenities. There’s no way for any one programmer to anticipate every possible way of doing so, especially without running the risk of Scunthorpes. Besides, what’s considered offensive is highly dependent on context. What an elementary school or a site geared towards children might want to censor is different from, say, a forum admin who just wants to keep the post titles on the front page from resembling a PornHub feed. How could a single list cover both situations? The problem’s difficult enough that many developers just prefer to throw up their hands and admit defeat.

The way I see it, the point of profanity filters isn’t to eliminate obscene language altogether. It’s to make using curse words harder, or at least difficult enough that 90% of people will accept being bowdlerized rather than putting in the effort to game the system. Sure, bored teenagers with sufficient free time can eventually figure their way past any possible logic one could put in place. That’s inevitable. But most people don’t want to bother putting in that kind of effort, especially if the filter works in such a way so as to keep the basic thrust of their message intact. If comic strips have taught me anything, it’s that it doesn’t take too much context for someone to figure out what four-letter word one should read in place of $#!%.

So, grawlix (npm | github.) It’s aimed at server-side Node for the moment (though, the way it’s written, I doubt it would be very hard to adapt for browser/client-side use.) For the purposes of time, I chose to limit the number of words I was targeting to a choice few (NSFW), key among them George Carlin’s "Seven Dirty Words." Instead, I decided to focus on making it easy for other devs to add their own filters as necessary, with the package acting as more of a replacement engine than anything. I eventually introduced a plugin system so as to take a more modular approach. The idea is to allow people to tailor their filters as much as possible to a given situation, picking and choosing what functionality they need to load in. As a proof of concept, I also released a plugin of my own aimed at ethnic and racial slurs: grawlix-racism (npm | github.)

So how did I do? Hard to say. I haven’t gotten much in the way of feedback, which is a little frustrating. It doesn’t help that I’m positive I’m just reinventing the wheel here (though if anyone else has shared a similar open-source solution along these lines, I have yet to find it.) In terms of the code, it’s possible that I might have gone overboard in terms of making things customizable, to the point that I may be overwhelming the user with options. But it’s hard for me to judge that on my own.

On the plus side, though, I really tested the hell out of this thing. These are the first NPM packages I’ve published where I’ve achieved 100% test coverage according to istanbul — and that’s not including all the extra regex and Scunthorpe checks I wrote. I also put a lot of effort into documenting things as much as I could. In addition to the standard README, I included five additional markdown files in a separate folder, with subjects ranging from word filters to output style configuration.

And that’s where things stand. A good learning experience for me, if nothing else. I just hope that it winds up coming in handy for someone at some point along the line. Even if it’s just to raid my regular expressions and hock the rest.

Sundered Seas Megagame Map – A Node.js Web Application

A screenshot of the Shattered Seas map

Link to the GitHub repository

So here’s something I’ve been meaning to share for a while. Back in January, I signed up to part of the control team for the Cleveland Megagame Council‘s annual event. What’s a megagame? Imagine a board game that involves over 40 different players with about 5-6 controllers riding herd over the whole thing, and you’re getting close. At the first control team meeting, though, I found out that there really wasn’t a solid, maintainable way set up for people to view the whole of the game board — a hex map that would update on a fairly frequent basis. This struck me as less than optimal.

So… forty-eight hours later…

Short story, I wrote a quick, fast-and-dirty Node.js/Express app that would display and update the game board as it changed more or less in real time. The data source was a Google Sheets spreadsheet that any member of the control team could update. It made running the game a whole lot smoother. Not to mention, it was the first Node app I’ve written that’s been exposed to a greater audience. (Much thanks to the folks at Heroku for hosting everything!)

The code is now up for public view on GitHub. While you’re at it, you can take a look at the interactive replay of the megagame’s events (also my work.)

All in all, a successful little side project, if I do say so myself.

Writershaming FAQ: how to use writershaming

Hello! This is the basic “how to use my site” document for writershaming. Now, I know that all the cool kids are making demonstration videos for this sort of thing these days… but frankly, I don’t have the time to make one and you don’t have the time to watch it. We’re supposed to be writing here. Like, right now. This very minute. So this’ll have to do.

Outline:

Logging In

To use writershaming, you’re going to need either a Facebook or Twitter account. Why? Because writershaming is a social app, first and foremost, and you’re going to need a social media account to get the most out of it anyway. (And also because authentication is complicated and boring and I don’t really see the need to reinvent the wheel in this case. But I digress.)

The quickest way to log in is to go up to the Login dropdown on the menu bar in the upper-right hand corner. Click on … via Facebook to log in using Facebook; click on … via Twitter to log in using Twitter. (If you’re on mobile and big massive buttons are more your style, you can also go to this page to do the same thing.)

Once you’ve selected your service, you’ll be redirected to either Facebook or Twitter to sign in to your account there. Approve writershaming’s access to your basic profile information (click here if you want more details on that). You should then be redirected back to the Dashboard.


The Dashboard

The Dashboard is where you can manage your writing projects and modify your profile information. As long as you’re logged in, you can return here by clicking the Dashboard link in the menu bar at the top of the page.

  • Viewing your writershaming public profile

    To view your public profile just as it’ll appear to any visitor to the site, click the View Public Profile link underneath your name at the top of the Dashboard. More on this further down.

  • Adding a project

    To add a project, click the big blue Add Project button. This will bring up a pop-up window that’ll ask you to fill out the following fields:

    • Title: The title of your project.
    • Project Stub: This will essentially be the URL / web address of the project’s detail page. This should be automatically generated for you as you fill in the title, after which point you can customize it as you please.
    • Estimated Total Words: The total number of words you expect to be in your project when complete. You can modify this later, so for the time being just guess. (As a general rule of thumb, novels are anywhere from 40,000 words or up, while short stories are generally 7,500 words or less.)
    • Plot: A brief description of your project’s plot. Optional.
    • Make Project Public or Private: You have the option to keep the new project private — i.e. only visible to you when you’re logged in — if you want. (Say, for instance, you’re creating a future project you intend to get around to, but don’t want anyone to know about it until you’ve actually started on it.) You can always modify this later by editing the project. Leave it alone if you’re fine with the project being visible to the public. (That is the point here after all, right?)

    Once you’re done, click the Save button. You should see the new entry added to your Dashboard’s list of projects.

  • Editing a project

    You can edit a project’s info by (big shock here) clicking the Edit button at the bottom of the project’s card. A pop-up very similar to the one you used to create the project will show up on screen. While most of it will be old hat to you, there are a few new fields here:

    • Project Status: This is… well… the status of the writing project. You can label a project in any of the following ways:
      • Not Started: Project hasn’t been started yet.
      • Planning: You’re researching the project, but haven’t actually put down any words yet.
      • In Progress: You’re actively working on the project.
      • On Hold: You’ve had to hold off on the project for one reason or another. (I’m sure you feel very guilty about it, though.)
      • Complete: Project complete! Yaaaaaay!
      • Canceled: You’ve admitted defeat and put your dreams on hold… or maybe you’ve realized this project wasn’t such a great idea anyway. Either way, you don’t have to explain yourself… at least to me. (quitter)

      Note that updating a project’s word count will automatically switch its status to In Progress, no matter what.

    • Notes: Any additional, non-plot-related notes you want people watching your progress to be able to see.
    • Delete Project: For when you want to blot a project from memory. Or you’ve accidentally created the same project twice or whatever. Note that, as the field’s description says, this cannot be undone. Once a project’s deleted, it’s gone forever. Period end. Even I won’t be able to recover it.

    Click the big blue Save button when you’re finished to save your changes.

  • Updating a project’s word count

    To update a project’s current word count, click the big blue Update Word Count button at the bottom of the project’s card. You’ll get a simple pop-up window with a single field that lets you update your current word count. Click Save to commit your changes.

  • Viewing a project

    To view a project’s page exactly as it looks to the public at large, click the View button at the bottom of the project’s card. You can also click the project’s title at the top of the card. Note that this will only be available if the project is set to public / is visible to the public at large.

  • Modifying your public profile’s URL

    At the very bottom of the Dashboard, you’ll notice a small panel titled Profile URL. This setting allows you to customize what URL your public writershaming profile appears at — in other words, the {{whatever}} in http://www.writershaming.com/users/{{whatever}} — if you care about that sort of thing. You can’t have the same URL as another user, so URLs are generally awarded on a first-come first-serve basis. (Please note that I reserve the right to quash or reassign URLs as I see fit.)

    To customize your profile URL, change the value in the text field to whatever it is you want. Then click the Check Availability button. If the new URL is available, a nice little green message will appear along with a Save button. Click the Save button to commit the change. Otherwise, you’ll see a red box informing you that the URL is already taken.


Public Profiles

Public writershaming profiles are simple pages that essentially list a user’s name and current writing projects. See above to how to get to your own public profile from the Dashboard. Click the Share or Tweet buttons at the bottom to share this page via Facebook or Twitter, respectively.


Projects

Each writing project has its own public page as well, accessible from a writer’s profile via the See Details link at the bottom of a project’s listing. This will show visitors the plot of the story or any notes you’ve entered. Click the Share or Tweet buttons at the bottom to share this page via Facebook or Twitter, respectively.


Logging Out

To log out of the site at any time, click the gray Logout link in the upper-right hand corner next to your name.


Troubleshooting

Problems? Technical glitches? Contact me here. Please include the word “writershaming” in the subject line, and let me know what browser and operating system you’re on.


Go to writershaming

Last modified January 16, 2016.

Writershaming FAQ: Permissions


Why do you need access to my email address? [Facebook Accounts]

I’m asking for this information just in case there’s some sort of technical glitch or failure and I need to get in touch with as many users as possible. Just to be clear, I promise that I will not, either now or in the future, share the email address of any writershaming user with any third party for marketing or advertising purposes. If you have any other concerns regarding sharing this information with me, please let me know via my contact page and I’ll do my best to address them.


Why do you need to read tweets from my timeline / see who I follow? [Twitter Accounts]

I don’t. Those are just the default permissions that Twitter gives every application. If it makes you feel any better, all this gives me is the ability to access the exact same information that’s already public on your Twitter page.


Go to writershaming

Last updated January 16, 2016

Fictional truth

Here I am, posting a random RSA key to my public blog for absolutely no reason whatsoever. Insert innocent humming here.

-----BEGIN RSA PUBLIC KEY-----
MIGIAoGAeslD4OIVq5Zcr7qCeDVlZK6cXW3aNG4iBtvslgDKsGeqjEX0tpN60tkm
7l37o9jMYUm4q3AKCo7XVotp7e0A1BCKjOczfkvv2S8eo0gtLB+Oj2fhLcNlCqtc
g8DeSdy2UUp68VHtaVg7/Hhu4IAgec9Cu7POXASWIsZRHyyFvkUCAwEAAQ==
-----END RSA PUBLIC KEY-----

Gettin’ back in the saddle (or much ado about Node.js)

So I’m not going to explain. I’m not going to make excuses for ignoring this blog for so long. I’m just going to go ahead and get started. And talk about some of the things I’ve learned and been looking into over the past year.

Node

Mainly, I’ve really gotten into Node.js. I was skeptical at first, but I’ve come around to realizing that it really does represent a more stripped-down, bare-bones method of web development. The community is massive and active — just see how many downloads per day NPM handles — and some of the work being done out there is really extraordinary. I’m especially excited about some of the new ES6 features now being offered by the platform. Integrated promises? Easily-extendable class structures (which I’ll admit have certain limitations, but make up for it with readability, at least compared to the other standard ways of making JS “classes”)? Sign me up.

(Speaking of NPM, I’ve actually published one or two modules of my own. They’re pretty simple and probably kind of outmoded at this point, but definitely learning experiences. I should probably talk about them on here at some point.)

Microservice Architecture

If I hadn't found draw.io, this would be a picture of the back of a napkin.

(quick sketch courtesy of draw.io)

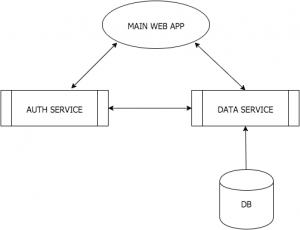
Hand-in-hand with the Node philosophy is the entire concept of microservices. The basic idea goes something like this: rather than have a single large web app that handles multiple tasks (like authentication and search indexing and view templates and whatnot), you have multiple web apps that interact with each other via REST calls. So rather than handling a login request with its own code, a web app will contact its Authentication app with the user’s login information, which will then do the work of checking the database and sending back a cookie and everything. The benefit to this approach is that it makes scaling — adding more servers or more resources to help a site handle more users — a lot easier. If your authentication process runs slow, for instance, you can simply add another instance of the Authentication app (either to an existing server or a new server) and have your main app load balance between the two.

While I’m sure this sort of architecture is old hat for a lot of people, it’s a new way of thinking for me. I’m currently going through the steps of designing a sort of content management system for businesses. I find I have to catch myself quite often going back to more conventional architecture. For instance, why bother having an integrated database service within the application when you can just have a Data Layer Microservice that the main app calls into? (This would also theoretically let me support multiple databases — which is a plus, since I don’t know what sort of infrastructure this might need to run on.) Well, if I’m going to do that, why not create an Authentication microservice app that interacts with the Data Layer microservice to handle those sorts of tasks?

Am I going too deep down the rabbit hole here? It’s possible. But I’m betting that the scalability of the approach will make up for any downsides.

The one big question that one has to worry about with this approach, of course, is security. How to make sure that a microservice only accepts input from our application and other related microservices. This especially becomes a concern if we’re working in an environment — say, like a cloud server solution — where we can’t know for certain that only authorized entities have access to the network. Even if that’s not the case, the paranoiac in me has too easy a time imagining some external hacker managing to insert or modify a request inside the local network and getting access to the Data Layer. Simple API keys might be vulnerable to a man-in-the-middle attack. I suspect my solution will probably involve a bunch of RSA certificates. More on this later, maybe.

JSON Web Tokens

Speaking of authentication, I’ve been looking into JSON Web Tokens, a new standard being pushed by Auth0, an authentication software-as-a-service which in itself seems promising for prototyping. Basically, it’s a standard way of writing the auth token one issues to a client in a manner that’s both more compact than previous XML-based token schemas and easily interpreted by multiple languages and frameworks. (I almost said auth cookie, but it seems that they’re avoiding using cookies as a way of getting past Cross-Origin Resource Sharing issues.) In particular, it seems to have been created with single sign-on across multiple applications in mind.

In general, I like it. It meshes with what I know about authentication, it’s compact, and it’s got room to expand things as one’s particular application might require. The one caveat again is — say it with me now — security. In its original form, it turns out that JWT revealed just a little too much to the client in a way that might compromise tokens signed with RSA certificates. So there’s obviously more work that needs to be done here. Still, the approach has enough promise that I’m considering using it in the CMS application I mentioned above, though perhaps in a slightly tweaked form.


That’s all for the moment, folks! Hopefully, you’ll be seeing a lot more of me on here in the near future.